

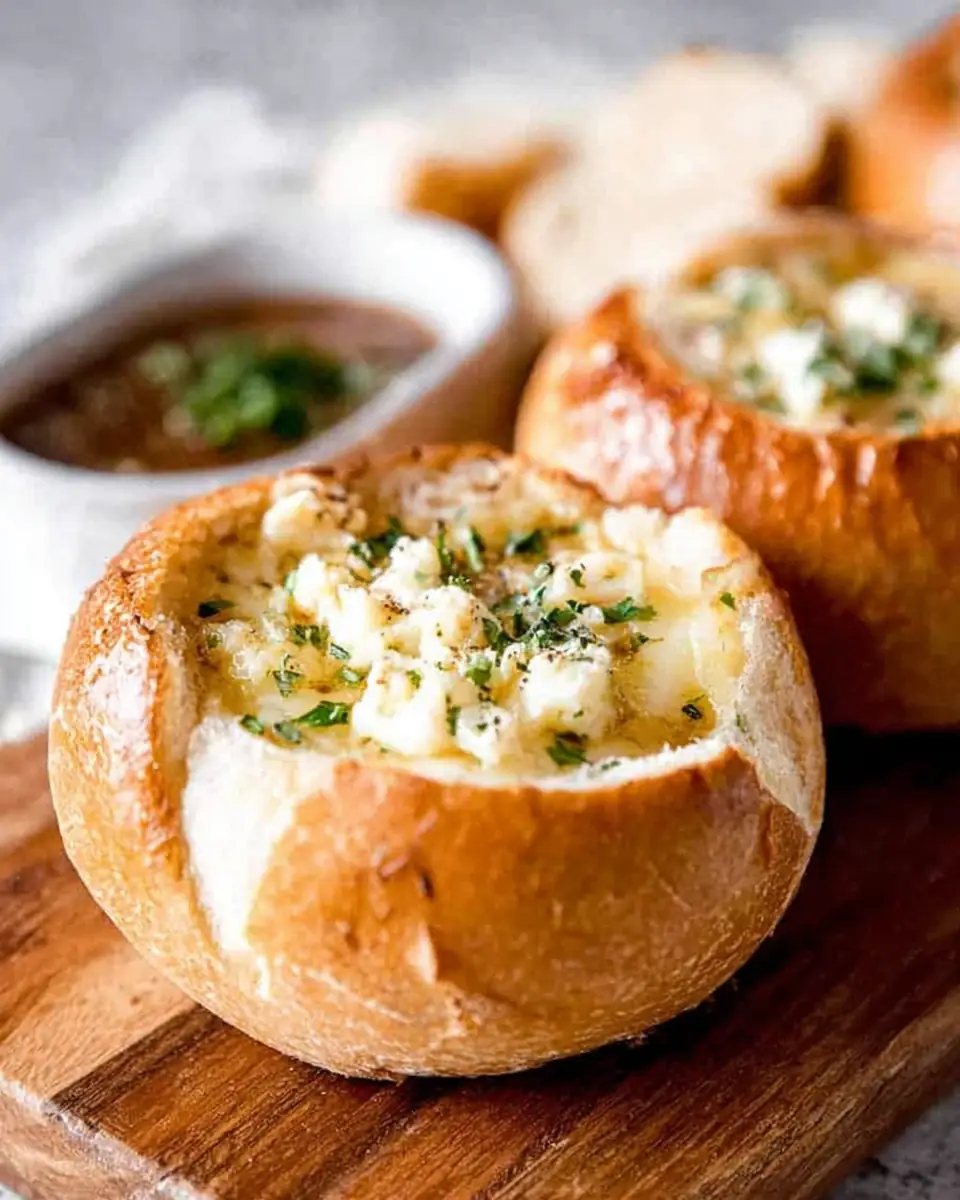
Homemade Bread Bowls: Perfect for Your Favorite Soups
There’s something deeply comforting about dipping into a warm bowl of soup, but what if the bowl itself was also part of the meal? Enter the homemade bread bowl—a delightful edible vessel that elevates any soup, stew, or chowder. Whether you’re planning a cozy family dinner or looking to impress at your next gathering, these bread bowls are the perfect blend of taste and presentation. This guide will walk you through the process of making your own bread bowls, offering tips, tricks, and variations to ensure your culinary creation is a success.
Why Make Homemade Bread Bowls?
Making bread bowls from scratch might seem intimidating, but it’s easier than you think and incredibly rewarding. Not only do they serve as a unique presentation, but the homemade touch adds a layer of warmth and love to your meal. Plus, you can enjoy the satisfaction of tearing into a freshly baked bread bowl and savoring the soft, doughy interior with your soup. Homemade bread bowls also allow you to experiment with different flavors and textures, making them a versatile addition to your culinary repertoire.
The Art of Bread Making
Bread making is an ancient craft, one that connects us to generations of bakers before us. The process of making bread is both science and art, requiring the right balance of ingredients and techniques. The transformation of simple ingredients like flour, water, and yeast into a delicious, crusty loaf is nothing short of magical. By making bread bowls at home, you engage in this timeless tradition, learning the nuances of dough and the satisfaction of creating a staple food from scratch.
The tactile experience of kneading dough, watching it rise, and then transforming it into a golden, crusty bowl is immeasurable. Each step is a testament to the power of human creativity and ingenuity. Whether you’re a novice baker or seasoned pro, making bread bowls adds a dimension of delight and curiosity to your cooking adventures.
Health Benefits of Homemade Bread
While store-bought bread can be convenient, homemade bread offers several health advantages. By making your own bread bowls, you can control the quality and type of ingredients used. This means you can avoid preservatives and additives often found in commercial bread. Additionally, homemade bread can be customized to fit dietary preferences, such as using whole wheat flour for added fiber or incorporating seeds and grains for extra nutrition.
Whole grains, seeds, and nuts can enhance the nutritional profile of your bread bowls, providing essential vitamins and minerals. These additions can also increase the fiber content, aiding digestion and promoting a sense of fullness. Moreover, by avoiding artificial additives and preservatives, homemade bread can be a cleaner, healthier choice for you and your family.
Ingredients You’ll Need:
- 2 1/2 cups warm water (around 110 to 115°F): Warm water helps activate the yeast, which is crucial for a good rise.
- 1 1/2 Tablespoons active dry yeast: The key to a good rise, ensuring your bread bowls are fluffy and well-leavened.
- 2 teaspoons granulated sugar: Feeds the yeast and aids in fermentation, enhancing the bread’s flavor and texture.
- 2 teaspoons salt: Enhances flavor, bringing out the natural taste of the flour and other ingredients.
- 2 Tablespoons olive oil: Adds richness and helps with the dough’s texture, making it more pliable and tender.
- 6-7 cups bread flour: Provides the structure and chewiness of the bread bowls. Bread flour is high in protein, which is essential for developing gluten.
- 1 large egg (beaten) and 1 Tablespoon milk: For the egg wash, which gives the bread bowls a beautiful, glossy finish, enhancing their visual appeal.
Step-by-Step Instructions:
Activate the Yeast: In the bowl of a stand mixer, combine warm water, sugar, and yeast. Let it sit for 5 to 10 minutes until the mixture becomes foamy. This step ensures your yeast is active and ready to leaven the dough. If your yeast doesn’t foam, it may be expired, and the dough will not rise properly.
Mix the Dough: Add salt, olive oil, and 2 cups of flour to the yeast mixture. Use the paddle attachment to mix until combined. Gradually add the remaining flour, one cup at a time. Switch to a dough hook as the mixture thickens, until a soft dough forms. You may not need all of the flour, so add it gradually to avoid a dry dough.
Knead the Dough: Knead on medium speed for 5-6 minutes until the dough is smooth and pulls away from the sides of the bowl. It should be soft but not sticky. Proper kneading develops the gluten network, which gives the bread its structure.
First Rise: Transfer the dough to a lightly greased bowl, cover with plastic wrap, and let it rise in a warm place for about 45 minutes or until it doubles in size. The first rise is crucial for flavor development.
Shape the Bread Bowls: Punch down the dough to release air bubbles, then turn it onto a clean surface. Divide into 8 equal pieces. Shape each piece into a ball and place them on parchment-lined baking sheets, leaving space between for rising.
Second Rise: Loosely cover the dough balls with plastic wrap and let them rise again for 30-45 minutes until doubled in size. The second rise allows the dough to relax and expand further, resulting in a tender crumb.
Prepare for Baking: Preheat your oven to 400°F. Create an egg wash by whisking together the beaten egg and milk. Brush this mixture over the risen dough balls for a glossy finish.
Bake: Bake the bread bowls for 22-26 minutes until they are golden brown on top. Let them cool for about 15 minutes. Baking transforms the dough’s texture, creating a crisp crust and soft interior.
Hollow Out the Bowls: Using a sharp serrated knife, carefully cut a circular “lid” from the top of each bread bowl. Remove some of the interior bread to create a hollow for your soup. This step is where your bread bowls come to life, ready to cradle your delicious soups.
Nutritional Information (per serving):
- Calories: 386 kcal
- Carbohydrates: 69 g
- Protein: 12 g
- Fat: 6 g
- Saturated Fat: 1 g
- Trans Fat: 1 g
- Cholesterol: 23 mg
- Sodium: 597 mg
- Fiber: 2 g
- Sugar: 1 g
- Unsaturated Fat: 4 g
Timing:
- Prep Time: 15 minutes
- Cook Time: 30 minutes
- Total Time: 2 hours 30 minutes
Serving Suggestions:
These bread bowls are perfect for hearty soups like clam chowder, beef stew, or creamy tomato soup. The crusty exterior and soft interior complement the textures of rich, hearty soups, creating a harmonious dining experience. Simply ladle your favorite hot soup into the hollowed-out bread bowls and enjoy! You can also experiment with different flavor profiles, such as serving spicy chili or a comforting chicken pot pie filling in these versatile bowls.
Customizing Your Bread Bowls
One of the joys of making homemade bread is the ability to customize it to your taste. Consider adding herbs like rosemary or thyme to the dough for an aromatic touch. For a bit of crunch, sprinkle sesame seeds or poppy seeds on top before baking. You can also experiment with different flours, such as whole wheat or spelt, to create a more wholesome bread bowl.
If you’re feeling adventurous, try incorporating cheese into your dough. The addition of cheddar or parmesan can create a savory twist, adding depth to your bread bowls. For those with a sweet tooth, consider a cinnamon or raisin-infused dough, transforming your bread bowls into a dessert option perfect for sweet soups or fruit compotes.
Tips for Perfect Bread Bowls
Temperature Control: Ensure your water is the right temperature to activate the yeast. Too hot, and you risk killing the yeast; too cold, and it may not activate properly.
Consistent Measurements: Measure your ingredients accurately, especially the flour. Too much flour can result in a dense bread bowl, while too little can cause the dough to be sticky and hard to work with.
Kneading Technique: Proper kneading is crucial for gluten development. If kneading by hand, use the heel of your hand to push the dough away from you, fold it back, and rotate. Repeat this process for about 10 minutes or until the dough is smooth.
Rising Environment: Create a warm, draft-free environment for your dough to rise. An oven with the light on or a microwave with a cup of hot water can serve as an ideal rising spot.
Baking Time: Keep an eye on your bread bowls as they bake. Ovens can vary, so check for a deep golden color and a hollow sound when tapped before removing them from the oven.
Final Thoughts
Homemade bread bowls are a fun, interactive way to enjoy your favorite soups and stews. With just a few simple ingredients and a bit of patience, you can create a memorable meal that feels both rustic and gourmet. The satisfaction of creating something beautiful and delicious from scratch is a reward in itself. As you perfect your bread bowl-making skills, you’ll find endless opportunities for creativity in the kitchen, turning everyday meals into unforgettable culinary experiences.
In conclusion, making bread bowls is not just about crafting a vessel for your soup; it’s about embracing an age-old tradition, exploring new flavors, and bringing a touch of artisan craftsmanship to your table. Whether you’re indulging in a creamy tomato bisque or a hearty beef stew, the bread bowl elevates the experience, merging taste and texture in a way that few other culinary creations can. So next time you’re in the mood for soup, consider serving it in a homemade bread bowl and watch as your guests delight in this edible surprise.


Homemade Bread Bowls
Perfect for serving soups or stews, these homemade bread bowls are crusty on the outside and soft on the inside.
- Stand Mixer
- Baking Sheets
Bread Dough
- 600 ml warm water (around 110 to 115°F)
- 1.5 Tablespoons active dry yeast
- 2 tsp granulated sugar
- 2 tsp salt
- 2 Tablespoons olive oil
- 6 cups bread flour (+ more for shaping)
- 1 large egg (beaten)
- 1 Tablespoon milk
- In the bowl of a stand mixer, combine the water, sugar, and yeast. Let sit for 5 to 10 minutes until the yeast is foamy.
- Add the salt, oil, and 2 cups of the flour, mixing well with the paddle attachment to combine. Continue to add the remaining flour, 1 cup at a time, switching to the dough hook partway through, until a nice soft dough forms. You may not need all of the flour.
- Knead for 5-6 minutes on medium speed until the dough is smooth and cleans the sides of the bowl. It shouldn’t be too sticky.
- Transfer to a lightly greased bowl and cover with plastic wrap. Let rise in a warm spot for about 45 minutes until doubled in size.
- Punch down the dough to remove air bubbles and turn the dough out onto a clean surface and divide into 8 equal pieces. Roll each piece of dough into a ball and transfer to baking sheets lined with parchment paper, leaving space for the dough to rise.
- Loosely cover with plastic wrap and let the dough rise for another 30-45 minutes until doubled in size again.
- Preheat oven to 400°F while the bread bowls are rising. Make an egg wash by whisking the egg and milk together in a small bowl. Brush it onto the risen bread bowls just before putting them in the oven.
- Bake for 22-26 minutes until golden brown on top. Cool for 15 minutes, then use a sharp serrated knife to cut lids off the top of each ‘bowl’. Remove some of the bread inside the bread bowl to make space for soup.
These bread bowls are perfect for serving creamy soups or stews. You can adjust the size to make mini bowls for side servings.

