

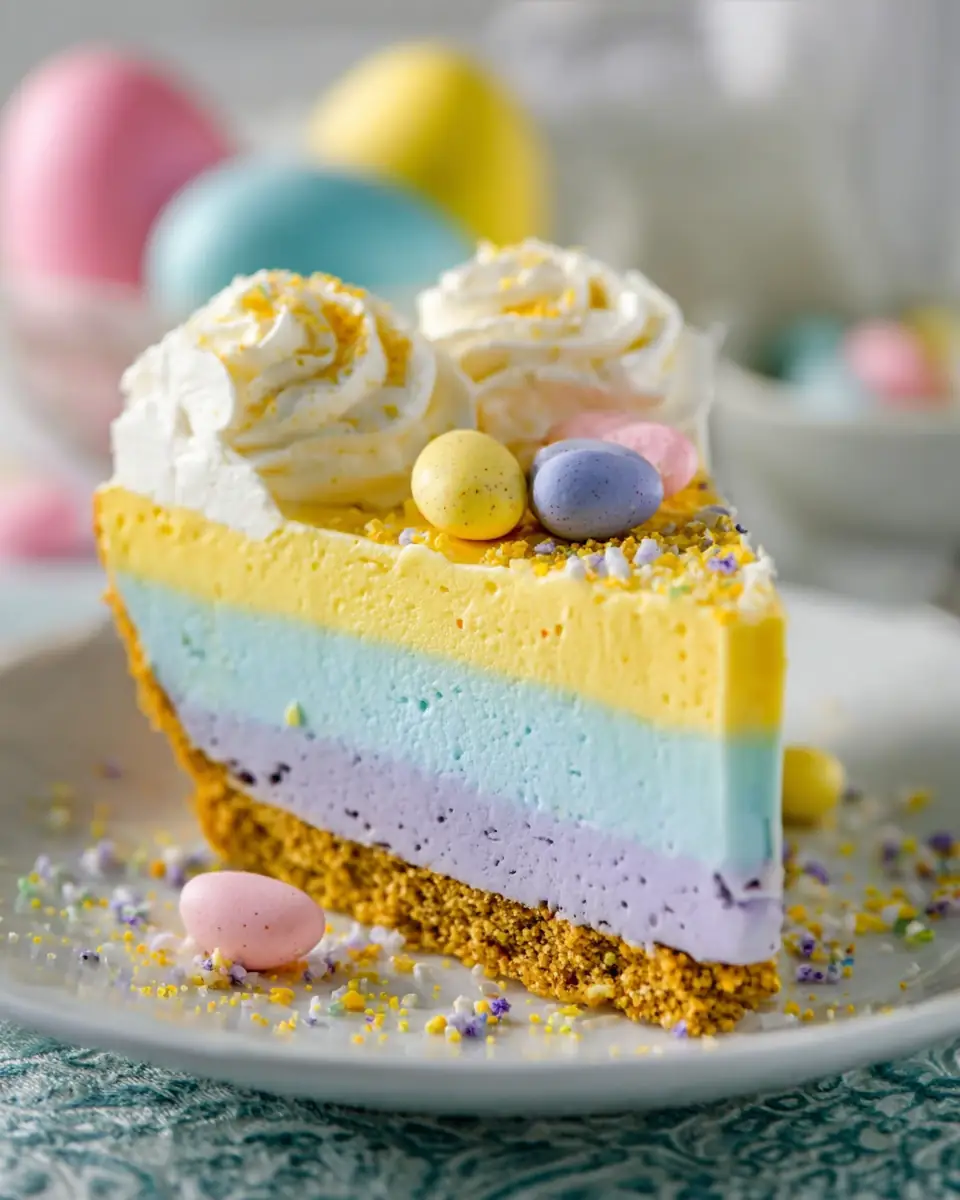
Easter Jell-O Pie: A Vibrant and Festive Treat for Your Easter Celebration
As the days grow longer and the first blooms of spring make their appearance, the season of renewal and joy is upon us—Easter. This time of year is synonymous with vibrant colors, lively gatherings, and, of course, delectable treats that bring everyone together. One dessert that perfectly captures the essence of Easter is the Easter Jell-O Pie. This no-bake, colorful creation is a feast for the senses, combining the playful nostalgia of Jell-O with the velvety smoothness of whipped cream, all atop a crunchy graham cracker crust. Whether you’re hosting an Easter brunch or simply looking to add a splash of color to your table, this pie is sure to delight both young and old alike.
Ingredients at a Glance
Before embarking on this culinary journey, let’s gather the ingredients required to create this masterpiece. The beauty of the Easter Jell-O Pie lies in its simplicity and the ease with which it can be customized to suit your tastes and preferences.
- Jell-O Flavors: Pink Starburst, Blue, Yellow, and Purple Jell-O are the stars of the show, creating a kaleidoscope of colors. These flavors not only bring a visual pop but also a delightful array of fruity tastes that can be tailored to your guests’ preferences.
- Whipped Cream: This essential component adds a light, creamy texture that wonderfully complements the Jell-O’s fruity flavors. Homemade whipped cream can be used for a richer taste, or you can opt for store-bought varieties for convenience.
- Graham Cracker Crust: A classic base that offers a deliciously crunchy contrast to the smooth filling. This crust can be purchased pre-made, or you can make it from scratch for a more personalized touch.
- Food Dye: Optional, but a few drops can intensify the vibrancy of your pie, making it even more eye-catching. This is particularly useful if you wish to match specific themes or color schemes for your Easter decorations.
- Butter: Used to bind the graham cracker crumbs into a firm crust, adding a rich, buttery undertone that enhances the overall flavor of the pie.
Step-by-Step Directions
Creating the Easter Jell-O Pie is a straightforward process that even novice bakers can master. Follow these step-by-step instructions to ensure your pie is a showstopper at your Easter celebration.
1. Prepare the Crust
The foundation of any great pie is its crust, and the Easter Jell-O Pie is no exception. The graham cracker crust provides a sweet and crunchy base that perfectly balances the creamy filling.
- Melt the Butter: Begin by melting 12 tablespoons of butter in the microwave until fully liquified. This step is crucial as it helps to bind the graham cracker crumbs together, forming a solid base.
- Mix with Graham Cracker Crumbs: In a medium bowl, combine the melted butter with 2½ cups of graham cracker crumbs. Stir the mixture until it reaches a thick, sand-like consistency. This texture ensures that the crust will hold together once pressed into the pan.
- Form the Crust: Transfer the crumb mixture into a springform pan. Use your fingers or the back of a spoon to press it firmly across the bottom and up the sides, creating an even, compact crust.
- Chill: Place the crust in the freezer to set while you prepare the Jell-O layers. This chilling step helps the crust to firm up, ensuring it maintains its shape when the pie is sliced.
2. Prepare the Jell-O Layers
The Jell-O layers are the heart of this pie, offering a delightful burst of color and flavor in every bite. Each layer is infused with whipped cream, creating a light, airy texture that melts in your mouth.
- Dissolve the Jell-O: For each color of Jell-O, place the powder into separate small bowls. Add ¾ cup of boiling water to each bowl, stirring until all the granules dissolve completely. This step is essential for achieving a smooth, lump-free consistency.
- Cool and Thicken: To each bowl, add ⅓ cup of cold water. Place the bowls in the fridge for 20-30 minutes, allowing the Jell-O to thicken without fully setting. This intermediate consistency is perfect for incorporating the whipped cream.
- Incorporate Whipped Cream: Add 4 ounces of whipped cream to each bowl. Mix vigorously until the whipped cream is fully integrated, resulting in a smooth, creamy consistency. This step adds a luxurious texture to the Jell-O, making it more dessert-like.
- Enhance with Food Dye: If desired, add a few drops of yellow and pink food dye to achieve brighter hues. Mix until the color is evenly distributed, ensuring each layer is vivid and eye-catching.
3. Assemble the Pie
Assembling the pie is a creative process that allows you to play with colors and patterns. Each layer is like a brushstroke on a canvas, contributing to the overall masterpiece.
- Layer the Jell-O: Begin by spreading the first Jell-O color (yellow is suggested, but feel free to choose your order) evenly over the chilled crust. Return the pie to the freezer for 5 minutes to set slightly. This brief freezing period prevents the layers from blending into each other.
- Build the Layers: Continue layering each color, returning the pie to the freezer for 5 minutes between each addition. This method ensures that each layer remains distinct and visually striking.
- Final Freeze: Once all layers are added, leave the pie in the freezer for 3-4 hours to fully solidify. This extended freezing time is crucial for achieving clean slices that showcase the vibrant layers.
4. Serve and Enjoy
Serving the Easter Jell-O Pie is an experience in itself. As you slice into the pie, the colorful layers are revealed, each one a testament to the care and creativity invested in its creation.
- Garnish: Before serving, top the pie with additional whipped cream for an extra touch of decadence. You can also add festive Easter-themed decorations, such as edible flowers or pastel-colored sprinkles, to enhance the presentation.
- Slice and Delight: Use a sharp knife to cut the pie into slices, wiping the blade clean between cuts to maintain the integrity of the layers. Enjoy this refreshing, colorful dessert with family and friends, savoring the harmonious blend of flavors and textures.
Nutritional Information
Understanding the nutritional content of your Easter Jell-O Pie can help you make informed choices about serving sizes and additional accompaniments. Each serving contains approximately:
- Calories: 497 kcal
- Carbohydrates: 48 g
- Protein: 6 g
- Fat: 32 g (Saturated Fat: 19 g, Unsaturated Fat: 10 g)
- Cholesterol: 88 mg
- Sodium: 445 mg
- Fiber: 1 g
- Sugar: 29 g
While this dessert is a delightful indulgence, moderation is key to enjoying it as part of a balanced diet.
Quick Tips

To ensure your Easter Jell-O Pie is a resounding success, consider these quick tips:
- Efficiency: To save time, prepare the crust and Jell-O simultaneously. This parallel preparation minimizes downtime and streamlines the process.
- Customization: Feel free to experiment with different Jell-O flavors and color combinations to match your personal taste or holiday theme. The possibilities are endless, allowing you to tailor the pie to your liking.
- Storing: If you make the pie ahead of time, cover it with plastic wrap and store it in the freezer until ready to serve. This ensures the pie remains fresh and prevents freezer burn.
Seasonal Inspiration
Easter Jell-O Pie is a seasonal delight that reflects the vibrant hues and uplifting spirit of spring. The use of pastel colors not only aligns with Easter traditions but also brings a sense of freshness and renewal, much like the season itself. You can draw inspiration from nature by incorporating edible flowers or using natural dyes derived from fruits and vegetables for a more organic approach.
Consider pairing this pie with other spring-themed dishes to create a cohesive Easter menu. For example, a light quiche or a fresh salad with seasonal greens can complement the pie’s sweetness, offering a balanced meal that celebrates the flavors and colors of spring.
The Joy of Easter Jell-O Pie
In closing, the Easter Jell-O Pie is more than just a dessert; it’s an expression of creativity and joy that brings people together. Its vibrant colors and refreshing flavors make it an ideal centerpiece for your Easter celebration, captivating both the eyes and the taste buds. As you gather with loved ones to celebrate the season of renewal, let this delightful pie serve as a reminder of the simple pleasures that make life sweet.
Embrace the joy and colors of Easter with this delightful Jell-O pie. It’s a simple, fun dessert that not only captivates the eyes but also tantalizes the taste buds—making it the perfect centerpiece for your Easter dessert spread! Whether enjoyed on a sunny afternoon or as a sweet ending to a festive meal, the Easter Jell-O Pie is sure to be a cherished part of your holiday tradition for years to come.
Conclusion
The Easter Jell-O Pie is a testament to the joy of culinary creativity. It’s a dish that invites you to play with colors and flavors, to celebrate the beauty of the season, and to share delightful moments with family and friends. As you indulge in the layers of this pie, remember that each slice is a piece of the joy and vibrancy that Easter brings. May this pie become a beloved tradition in your home, inspiring smiles and sweet memories for generations to come.
Easter Jell-O Pie

A colorful and delightful pie perfect for Easter celebrations, layered with vibrant Jell-O and creamy whipped topping.
- Springform Pan
Pie Crust
- 2.5 cups Graham Cracker Crumbs
- 12 tbsp Butter (1 ½ sticks)
Jell-O Layers
- 0.5 package Pink Starburst Jell-O (a little under 2 ounces)
- 1.5 ounces Blue Jell-O (½ Package)
- 1.5 ounces Yellow Jell-O (½ Package)
- 1.5 ounces Purple Jell-O (½ Package)
- 16 ounces Whipped Cream (divided)
- 3 cups Boiling Water
- 1.33 cup Cold Water (divided)
- 1 packet Yellow Food Dye (optional)
- 1 packet Pink Food Dye (optional)
- Melt your butter in the microwave until it’s fully liquified.
- Combine the graham cracker crumbs and melted butter in a medium bowl and mix until a thick, sand texture occurs.
- Place the mixture in your springform pan and spread it across the bottom and up the sides, pressing it down so it packs in.
- Place the crust in the freezer until you’re ready to add layers.
- Place each color of Jell-O powder in its own small bowl. Place ¾ cup boiling water in each bowl and stir until no graininess remains on the bottom of the bowl.
- Place ⅓ cup cold water in each bowl and stir once more.
- Place the bowls of Jell-O in the fridge for about 20-30 minutes. You don’t want it to be solidified, just thickened.
- Add 4 ounces of whipped cream to each Jell-O bowl and vigorously mix until fully combined. This may take a minute or two, per bowl.
- If you’re using food dye to add more color to the yellow and pink, add that at this point and turn until no color streaks appear and you’ve reached your desired shades of color.
- Place the first color (I used yellow, but you can do your own color order) in the crust and spread even. Place the pie back in the freezer for 5 minutes, then add the next color, then back in the freezer for 5 minutes. Repeat this process until all 4 colors have been added.
- Leave the pie in the freezer for 3-4 hours or until completely solidified all the way through.
- Top with whipped cream, if desired, and enjoy!
For a vibrant presentation, feel free to experiment with different Jell-O flavors and colors.
