

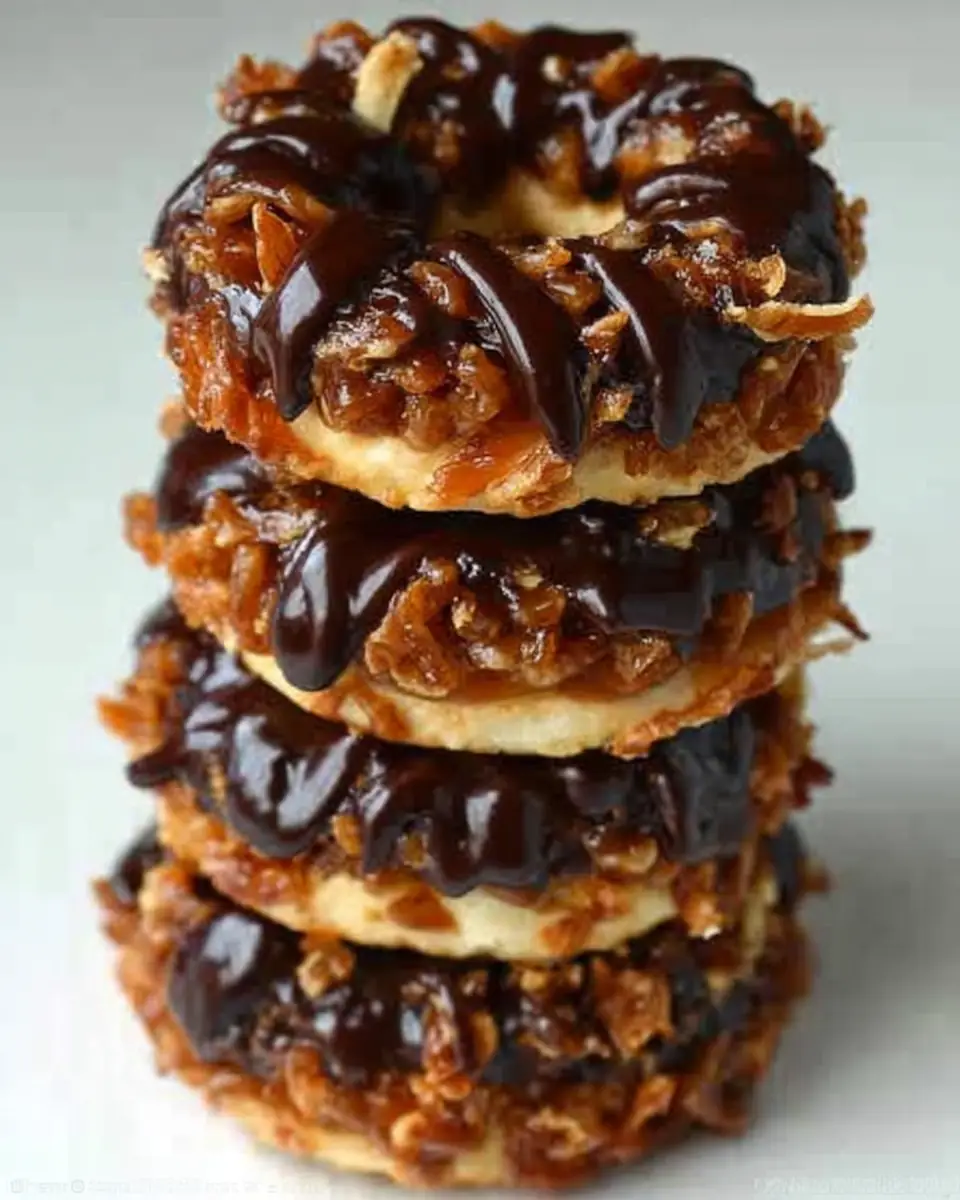
If you’ve ever found yourself dreaming of those delectable Girl Scout Samoas cookies, you’re in for a treat! This comprehensive guide will walk you through creating homemade Samoas that are every bit as delicious as the originals. Perfectly combining buttery shortbread, rich caramel, toasted coconut, and luscious dark chocolate, these cookies are sure to satisfy your sweet tooth.
A Brief History of Samoas
Before we dive into the recipe, let’s take a moment to appreciate the history of Samoas cookies. These iconic cookies, known as Caramel deLites in some regions, have been a staple of the Girl Scouts’ annual cookie sales for decades. Introduced in the mid-1970s, Samoas quickly became a fan favorite thanks to their unique combination of flavors and textures. The cookie is a perfect representation of how diverse ingredients can come together to create something truly special.
The history of Girl Scout cookies dates back to the early 1900s when the Girl Scouts began selling home-baked cookies as a way to fund their activities. Over the years, the operation grew into a nationwide phenomenon. The introduction of Samoas marked a significant expansion of their product line, offering a unique alternative to the more traditional cookies like Thin Mints and Trefoils.
Samoas are celebrated for their intricate composition—each component playing a crucial role in delivering that unforgettable taste. From the crispy shortbread foundation to the gooey caramel and crunchy coconut topping, finished with a rich chocolate drizzle, every bite is a symphony of flavors and textures. This combination has not only won over countless fans but has also inspired numerous homemade versions, allowing cookie enthusiasts to enjoy them year-round.
Ingredients
For the Cookies:
- 1 cup unsalted butter, at room temperature
- 1/2 cup sugar
- 2 cups all-purpose flour
- 1/4 teaspoon baking powder
- 1/2 teaspoon salt
- 2 tablespoons milk
- 1/2 teaspoon vanilla extract
For the Coconut Topping:
- 3 cups shredded sweetened coconut
- 15 ounces store-bought or homemade soft caramels
- 3 tablespoons whole milk
- 1/4 teaspoon salt
- 8 ounces dark chocolate (See Kelly’s Notes for specifics)
Instructions
Make the Cookies:
-
Cream the Butter and Sugar: In the bowl of a stand mixer fitted with the paddle attachment, cream together the butter and sugar until the mixture is light and fluffy, about 3 to 5 minutes. This step is crucial as it incorporates air into the dough, resulting in a tender cookie.
-
Prepare the Dry Ingredients: In a separate bowl, whisk together the flour, baking powder, and salt. Whisking helps to evenly distribute the baking powder and salt throughout the flour, ensuring consistent results.
-
Combine Ingredients: Gradually add the dry ingredients to the creamed butter in three increments, mixing well between each addition. Scrape down the sides of the bowl as needed. Add the milk and vanilla extract, blending until combined and the dough begins to come together in large pieces. The addition of milk adds moisture, resulting in a dough that’s easy to work with.
-
Chill the Dough: Divide the dough in half and press each portion into a disk. Wrap the disks securely in plastic wrap and refrigerate until firm, about 1 hour. Chilling the dough helps prevent the cookies from spreading too much during baking.
-
Preheat the Oven: Set your oven to 350ºF. Preheating ensures that your cookies bake evenly from the moment they enter the oven.
-
Roll and Cut the Dough: Once chilled, roll each disk out onto a lightly floured surface to a thickness of 1/8-inch. Cut out as many cookies as possible with a doughnut-shaped cookie cutter. Refer to Kelly’s Notes for alternative methods if needed. Place the cookies on a Silpat or parchment paper-lined baking sheet. Using a lined sheet prevents sticking and promotes even baking.
-
Bake: Bake the cookies for 10 to 12 minutes, rotating the baking sheet halfway through. Look for a pale golden brown color. Transfer the cookies to a wire rack to cool completely. Cooling on a wire rack prevents the cookies from becoming soggy.
Make the Coconut Topping:
-
Toast the Coconut: Spread the coconut flakes onto a baking sheet lined with parchment paper. Bake in a 350ºF oven for about 10 minutes until toasted, stirring frequently to ensure even browning and prevent burning. Set aside once done. Toasting the coconut enhances its flavor and adds a delightful crunch.
-
Melt the Caramel: In a double-boiler, melt the caramels with the milk and salt. Stir until fully melted, then remove from heat. Mixing ¾ of the caramel with the toasted coconut in a large bowl creates a cohesive topping that adheres well to the cookies.
-
Assemble the Cookies: Spread the remaining ¼ cup of caramel atop the cooled cookies, then press on a portion of the coconut mixture. Let the cookies cool for 30 minutes. If the caramel-coconut mixture becomes too thick, gently warm it in the double-boiler until spreadable. The sticky caramel acts as an adhesive for the coconut topping.
-
Add the Chocolate: Melt the dark chocolate in a double-boiler or microwave. Dip the bottoms of the cookies into the chocolate and place them on a wax paper-lined baking sheet. Use a fork to drizzle more chocolate over the tops. Allow the chocolate to harden fully before serving. The chocolate not only adds flavor but also creates a delightful textural contrast.
Kelly’s Notes:

-
Cookie Cutter Alternatives: If you lack a doughnut-shaped cookie cutter, use a circular 2-inch cutter along with a smaller circular cutter (like a spice cap) to form the ring shape. This ensures you achieve the classic Samoa look without specialized tools.
-
Dough Handling: If the dough is too firm after chilling, let it rest at room temperature for 10 minutes before rolling. This makes it more pliable and easier to work with.
-
Baking Tips: Aim for a pale golden color on the shortbread for the best texture. When in doubt, it’s better to slightly underbake. A softer cookie will complement the chewy caramel and crisp coconut.
-
Chocolate Measurements: If using dark chocolate chips, 8 ounces equates to approximately 1 ⅓ cups. Opt for high-quality chocolate for the best results.
-
Coconut Watch: Coconut can burn quickly, so keep a close eye and stir often while toasting. Burnt coconut can impart a bitter taste, so vigilance is key.
-
Caramel Adhesion: Using the reserved caramel to coat the cookies creates a sticky base for the coconut topping. This step ensures that the topping stays put once the cookies are assembled.
Variations and Serving Suggestions
-
Variations: While traditional Samoas are perfect on their own, consider adding a pinch of cinnamon to the coconut mixture for a warm, spicy twist. Alternatively, try using milk chocolate instead of dark for a sweeter taste. You can also experiment with adding a light sprinkle of sea salt on top of the chocolate drizzle for a sophisticated sweet-salty combination.
-
Serving Suggestions: Pair these cookies with a cold glass of milk or a warm cup of coffee. They also make a delightful addition to dessert platters and are sure to impress at gatherings. For a creative presentation, serve them alongside a scoop of vanilla ice cream or a bowl of fresh berries to balance the rich flavors.
Storage Tips
To keep your Samoas fresh, store them in an airtight container at room temperature for up to a week. If you wish to enjoy them over a longer period, consider freezing the cookies. Place them in a single layer in a freezer-safe container, separating layers with parchment paper, and they will keep for up to three months. Thaw at room temperature before serving. For added freshness, consider placing a slice of bread in the container to help retain moisture and prevent the cookies from becoming stale.
Troubleshooting Common Problems
Even with the best intentions, baking mishaps can happen. Here are a few common issues and their solutions:
-
Cookies Spreading Too Much: Ensure your butter is not too soft. If the dough is too warm, the cookies may spread excessively. Chilling the dough is crucial for maintaining the shape.
-
Caramel Too Thick: If your caramel becomes too thick to work with, gently warm it again over a double-boiler. Adding a splash of milk can also help restore its smooth consistency.
-
Chocolate Bloom: Sometimes chocolate can develop a white, powdery appearance known as bloom. This is due to sugar or fat rising to the surface. To avoid this, ensure the chocolate is tempered correctly, and store the cookies in a cool, dry place.
Star Rating Reminder
Did you try this recipe? We’d love to hear your thoughts! Don’t forget to leave a star rating below and share your homemade Samoas experience with us. Your feedback helps others discover the joys of making these delicious cookies at home.
With this homemade Samoas cookie recipe, you can enjoy the rich and satisfying taste of your favorite treat anytime you desire. The combination of buttery shortbread, chewy caramel, toasted coconut, and rich chocolate is irresistible and will surely delight anyone who tries them. Happy baking!


Homemade Samoas Cookies
These homemade Samoas Cookies are a delightful treat, combining buttery shortbread, caramel, toasted coconut, and rich dark chocolate.
- Stand Mixer
- Baking Sheet
- Parchment Paper
- Double Boiler
- Wire Rack
- Wax Paper
For the cookies
- 227 g unsalted butter (at room temperature)
- 100 g sugar
- 240 g all-purpose flour
- 0.25 tsp baking powder
- 0.5 tsp salt
- 30 ml milk
- 0.5 tsp vanilla extract
For the coconut topping
- 300 g shredded sweetened coconut
- 425 g soft caramels (store-bought or homemade)
- 45 ml whole milk
- 0.25 tsp salt
- 227 g dark chocolate (See Kelly’s Notes)
- In the bowl of a stand mixer fitted with the paddle attachment, cream together the butter and sugar until light and fluffy.
- In a separate bowl, whisk together the flour, baking powder and salt. In three increments, add the flour mixture to the creamed butter, mixing between each addition and scraping down the sides of the bowl as necessary.
- Add the milk and vanilla extract, blending until combined and the dough begins to come together in large pieces.
- Use your hands to divide the dough in half, pressing it together to compact it into two disks. Wrap the disks securely in plastic wrap and refrigerate them until firm, about 1 hour.
- Preheat the oven to 350ºF. Once the dough has chilled, roll each disk out onto a lightly floured surface until it is 1/8-inch thick.
- Cut out as many cookies as possible with a doughnut-shaped cookie cutter. Place the cut-out cookies on a Silpat or parchment paper-lined baking sheet and repeat with remaining dough.
- Bake the cookies for 10 to 12 minutes, rotating the baking sheet half-way through, until the cookies are pale golden brown. Transfer the cookies to a wire rack to cool completely.
- Spread the coconut flakes onto a baking sheet lined with parchment paper. Bake the coconut for about 10 minutes in a 350ºF oven until toasted, stirring frequently to ensure even browning.
- Melt the caramels, milk and salt in a double-boiler by placing the caramels in a medium saucepot set over a large saucepot of simmering water. Cook, stirring, until the caramels are fully melted.
- Remove the saucepot from the heat and combine ¾ of the caramel with the toasted coconut in a large bowl.
- Carefully spread the remaining ¼ cup of caramel atop the cooled cookies then press on a portion of the coconut mixture. Let the cookies cool for 30 minutes.
- Melt the dark chocolate in a double-boiler or in the microwave. Dip the bottoms of the cookies in the chocolate and place them on a wax paper-lined baking sheet.
- Use a fork to drizzle the tops with chocolate. Let the cookies sit until the chocolate hardens fully.
If you don’t have a doughnut-shaped cookie cutter, you can use two cookie cutters (such as a circular 2-inch and a circular 1-inch) to form the ring shape. Coconut burns quickly, so keep an eye on it and stir often!
