

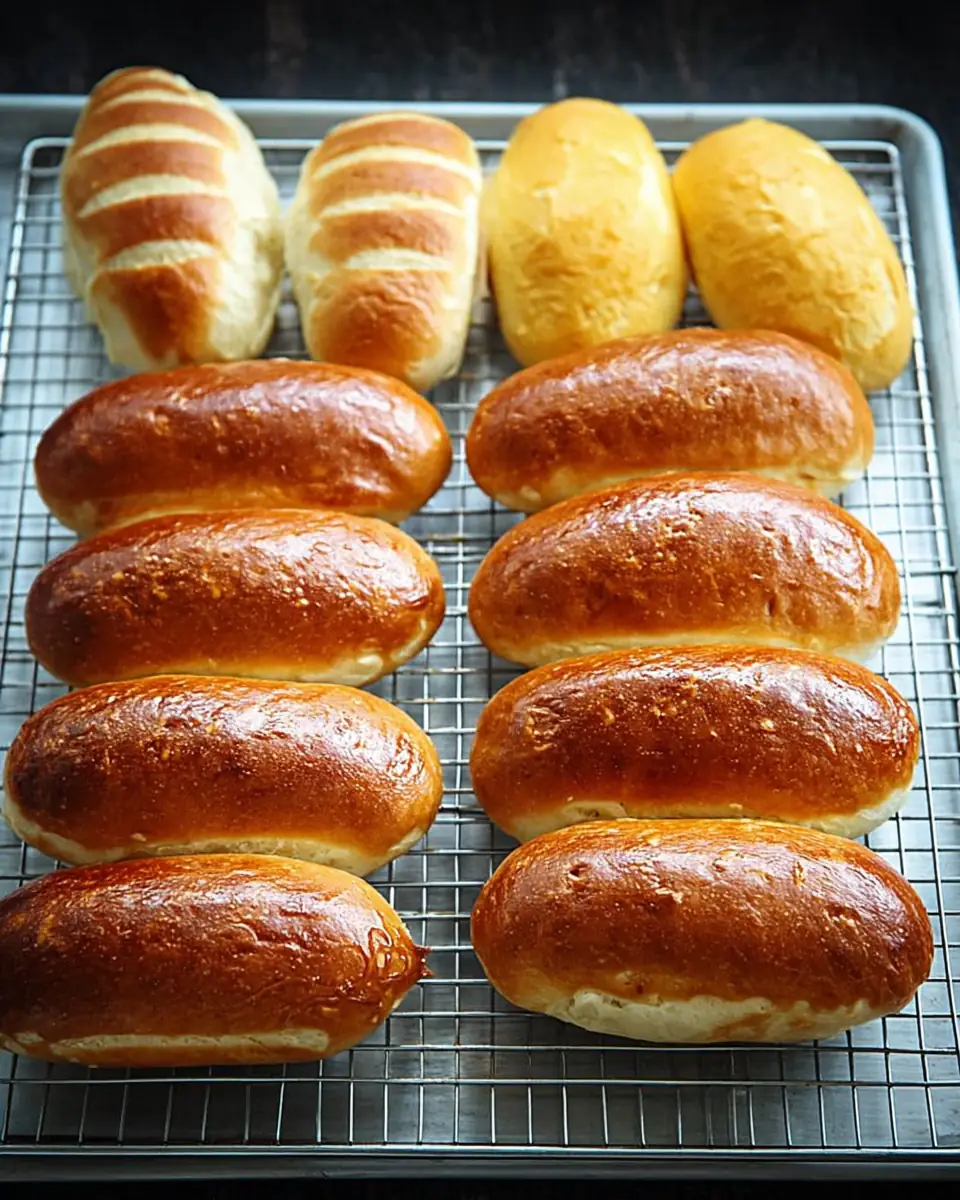
Quick Homemade Hot Dog and Hamburger Buns: A Delicious and Easy Recipe
There’s nothing quite like the satisfaction of making your own bread at home, especially when it comes to classic staples like hot dog and hamburger buns. Whether you’re hosting a summer BBQ or simply craving a homemade touch to your favorite meals, this quick and easy recipe for homemade buns will elevate your culinary experience. With minimal ingredients and just a bit of patience, you’ll have fresh, fluffy buns that are perfect for any occasion.
Why Make Your Own Buns?
Freshness and Flavor
One of the main reasons to make your own buns is the unparalleled freshness and flavor they offer. Store-bought buns can often be laden with preservatives to extend their shelf life, which can compromise their taste and texture. Homemade buns, on the other hand, are fresher and have a richer flavor profile that enhances any meal they accompany. The aroma of freshly baked bread that fills your kitchen is an added bonus that store-bought options simply can’t compete with.
Ingredient Control
Making your own buns gives you complete control over the ingredients. This means you can cater to specific dietary requirements or preferences. Whether you opt for organic flour, choose to use less sugar, or decide to add whole grains, the choice is yours. For those with dietary restrictions or allergies, this control is invaluable. Additionally, you can experiment with different types of flours, such as whole wheat or gluten-free blends, to suit your dietary needs.
The Joy of Baking
There is a unique joy and sense of accomplishment that comes from baking your own bread. The process of watching simple ingredients transform into something delicious is both rewarding and therapeutic. Baking at home can also be a fun family activity, allowing even young children to participate in the mixing and shaping of the dough.
Ingredients You’ll Need
To embark on this delightful baking journey, gather the following ingredients:
- 4 cups (525 g) Bread Flour or All-Purpose Flour: Both types of flour work well, but bread flour will give your buns a slightly chewier texture. All-purpose flour will provide a softer bun, which some may prefer for a more traditional texture.
- 1 Tablespoon (10 g) Active Dry Yeast: Essential for helping the dough rise. Active dry yeast needs to be dissolved in water and activated before being mixed with other ingredients.
- 1 cup (230 g) Warmed Water: Ensure the water is between 90-100 degrees to properly activate the yeast. If the water is too hot, it can kill the yeast, preventing the dough from rising.
- 1/4 cup (55 g) Sugar: Use coconut sugar, maple sugar, or cane sugar according to your preference. The sugar not only sweetens the dough slightly but also feeds the yeast, aiding in fermentation.
- 1/4 cup Melted Butter: Adds richness and flavor to the dough. The fat in the butter helps to create a tender crumb.
- 2 Eggs (divided!): One egg is incorporated into the dough, while the other is used for an egg wash. Eggs add richness and help bind the dough together.
- 1 tsp (5 g) Unrefined Salt: Enhances the flavor of the buns. Salt also strengthens the gluten structure in the dough.
- Sesame or Poppy Seeds: Optional, for a decorative and tasty garnish. These seeds add a subtle crunch and nutty flavor to the finished buns.
Directions
Step 1: Activate the Yeast
Begin by activating the yeast. In a stand mixer or mixing bowl, combine the warmed water and yeast. Allow the mixture to sit for about 3 minutes, giving the yeast time to bloom and activate. This step is crucial for ensuring your buns rise properly. You should see a frothy layer form on the surface of the water, indicating that the yeast is active and ready to work its magic.
Step 2: Prepare the Dough
Once the yeast is activated, add the flour, sugar, melted butter, one egg, and salt to the yeast mixture. Mix everything together until the dough no longer sticks to the sides of the bowl. If the dough appears too sticky, add an additional tablespoon of flour. Conversely, if it seems too dry, incorporate a tablespoon more of water. The desired consistency should resemble play dough—soft, pliable, and slightly tacky to the touch.
Step 3: Let the Dough Rise
Transfer the dough to a large greased bowl, cover it with a damp cloth or plastic wrap, and let it rest in a warm spot for about 1 hour. This process, known as proofing, allows the dough to double in size. A slightly warmed oven serves as an ideal environment for this step. Simply preheat your oven to the lowest setting for a few minutes, turn it off, and place the covered bowl inside to rise.
Step 4: Shape the Buns
Once the dough has risen, gently punch it down to release any air bubbles and divide it into 10-12 equal portions. Use a kitchen scale for precise measurements if desired. Shape the dough into round balls for hamburger buns or long, skinny logs for hot dog buns. Arrange them on a cookie sheet lined with parchment paper, ensuring each piece is about 3 inches apart to allow for expansion during baking.
Step 5: Second Rise
Allow the shaped dough to rise in a warm spot for another 30 minutes. This second rise helps achieve the perfect texture and ensures your buns will be light and fluffy. The dough should almost double in size again, resulting in a soft and airy bun.
Step 6: Egg Wash and Garnish
In a small bowl, whisk together the second egg with 1 teaspoon of water. Lightly brush this egg wash over the top of each dough ball. If you like, sprinkle sesame or poppy seeds on top for added flavor and texture. The egg wash not only gives the buns a beautiful golden color but also helps the seeds adhere to the surface.
Step 7: Bake
Preheat your oven to 375 degrees Fahrenheit and bake the buns for 13-15 minutes, or until they are golden brown. Keep an eye on them to ensure they don’t overbake, which can lead to a dry texture. Once baked, let them cool slightly on a wire rack before serving. This cooling period allows the buns to set and makes slicing easier.
Tips for Success

Temperature Control
Temperature is key in bread baking. Ensure your water is the right temperature (90-100 degrees) to activate the yeast effectively. Additionally, maintaining a warm environment for the dough to rise is crucial. If your kitchen is on the cooler side, consider placing the dough in a slightly warmed oven as mentioned earlier.
Proofing Environment
Creating an ideal proofing environment can make a significant difference in the final texture of your buns. A warm, draft-free area is best. If your oven has a proofing setting, this is an excellent option. Alternatively, placing the dough near a warm stove or in a sunny spot can help.
Consistency
Adjust the dough with additional flour or water as needed to achieve the right consistency. The dough should be soft and pliable, but not overly sticky. A little stickiness is normal, but if it’s too wet, the buns can spread too much during baking.
Enjoy Your Homemade Creations!
With this simple recipe, you can enjoy delicious, homemade hot dog and hamburger buns any time you wish. Customize them to your liking, and pair them with your favorite fillings for a meal that’s sure to impress. Whether you’re topping a burger with all the fixings or loading a hot dog with mustard and relish, these buns will be the perfect vessel. Happy baking!
Versatility in Use
These homemade buns are incredibly versatile. Beyond burgers and hot dogs, they can be used for a variety of sandwiches, from classic deli meats to veggie burgers. You can also experiment with adding herbs or spices to the dough for a unique flavor twist. Imagine rosemary-infused buns for a gourmet touch or a hint of garlic for a savory delight.
Storing Your Buns
If you find yourself with extra buns, storing them properly will ensure they remain fresh for later use. Allow the buns to cool completely, then place them in an airtight container or resealable plastic bag. They can be stored at room temperature for up to two days. For longer storage, consider freezing them. Simply wrap each bun individually in plastic wrap and place them in a freezer-safe bag. When ready to use, thaw at room temperature or warm them in the oven for a few minutes.
Conclusion: Elevate Your Culinary Experience
Homemade hot dog and hamburger buns are more than just a vessel for your favorite fillings; they are an opportunity to elevate your culinary experience. The satisfaction of creating something delicious from scratch, coupled with the ability to customize ingredients to your liking, makes this recipe a must-try for any home baker. Whether you’re a seasoned baker or a beginner, these buns are easy to make and will impress your family and friends. So roll up your sleeves, preheat your oven, and enjoy the delicious rewards of homemade bread.


Quick Homemade Hot Dog and Hamburger Buns
These homemade buns are perfect for your next barbecue. Freshly baked and customizable with your favorite seeds.
- Stand Mixer
Bread Flour or All Purpose
- 525 g Bread Flour or All Purpose
- 10 g Active Dry Yeast
- 230 ml Warmed Water (between 90-100 degrees)
- 55 g Sugar (Coconut sugar, maple sugar or cane sugar)
- 60 g Melted Butter
- 2 pieces Eggs (divided)
- 5 g Unrefined Salt
- as needed g Sesame or Poppy Seeds (for garnish)
- In a stand mixer or by hand, mix together the warmed water and yeast in a bowl. Allow the yeast to ‘bloom’ in the warm water for 3 minutes to help activate the yeast.
- Add the flour, sugar, melted butter, 1 egg and salt mixing everything together until it no longer sticks to the walls of the bowl.
- Cover and rest dough in a large greased bowl for 1 hour in a warm spot. Dough should double in size.
- Punch the dough down and divide into 10-12 even balls. Roll into round balls for hamburger buns or long skinny logs for hot dog buns. Place on cookie sheet 3 inches apart. Let rise in a warm spot for 30 minutes.
- In a small bowl, combine the second egg and 1 teaspoon of water. Lightly brush egg wash on top of each proofed dough ball. Garnish with sesame or poppy seeds if preferred.
- Bake at 375 degrees for 13-15 minutes until golden brown.
These buns can be frozen after baking for up to a month. Simply thaw and reheat before serving.
