

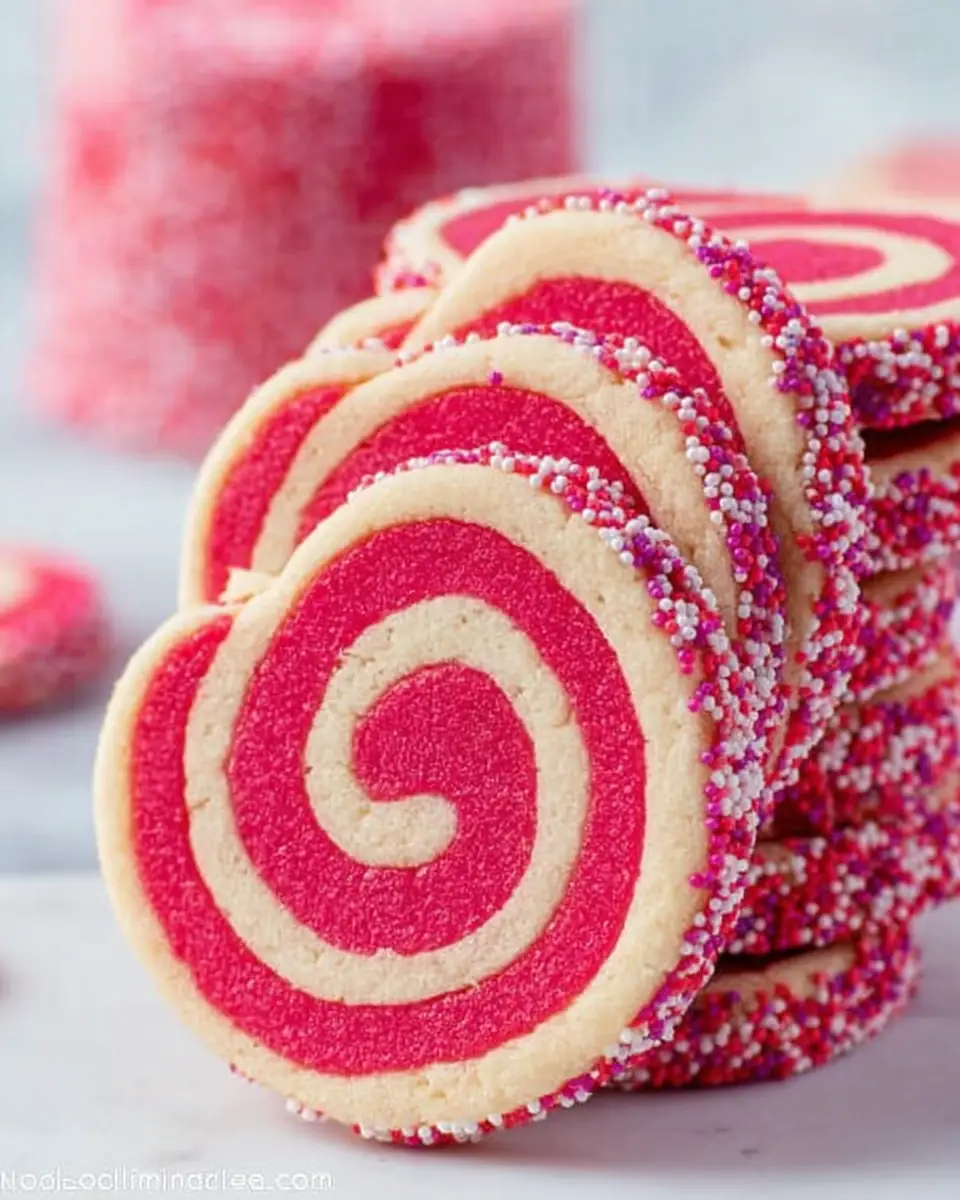
Celebrate Love with Homemade Valentine’s Day Swirl Cookies
Valentine’s Day is a special occasion that invites us to express our love and affection in delightful and creative ways. Whether you’re celebrating with a special someone, friends, or family, nothing says “I love you” more than a batch of homemade Valentine’s Day Swirl Cookies. These exquisite treats boast a buttery, tender cookie base swirled with vibrant colors and sprinkled with festive decorations that captivate the heart and the taste buds. This recipe is not only easy to follow but also offers room for creativity, making it a perfect project for bakers of all skill levels. Let’s dive into the world of baking and explore how to make these enchanting cookies.
Ingredients You’ll Need
Before you start your baking adventure, it’s important to gather all the necessary ingredients. These cookies are made with simple pantry staples, allowing the vibrant colors and creative presentation to take center stage:
- 2 cups flour – This is the foundation of your dough, providing structure and substance. The type of flour can affect the texture of the cookies, so all-purpose flour is recommended for a balanced, soft crumb.
- ½ teaspoon baking powder – Essential for a light, airy texture. Baking powder acts as a leavening agent, helping the dough to rise slightly and create a tender, fluffy cookie.
- ¼ teaspoon salt – Balances the sweetness and enhances all the flavors. A pinch of salt can make a significant difference in bringing out the subtle nuances of the other ingredients.
- ⅔ cup unsifted powdered sugar – Contributes to the delicate sweetness and tender crumb of the cookies. Powdered sugar dissolves quickly and helps achieve a smooth texture.
- ¼ cup granulated sugar – Adds structure and a slight crispness to the cookie edges. The granulated sugar ensures the cookies have a satisfying crunch.
- 2 ½ sticks unsalted butter, cut into chunks – Infuses the cookies with rich flavor and a melt-in-the-mouth texture. Using unsalted butter gives you better control over the saltiness of the final product.
- 1 teaspoon vanilla extract – Adds a comforting, familiar aroma that complements the cookie’s flavor. Vanilla extract is a classic addition, providing depth and warmth to the taste.
- ½ teaspoon food coloring of your choice – Allows you to customize the swirl with colors like pink or red, perfect for Valentine’s Day. Gel food coloring is recommended for more vibrant hues without altering the dough’s consistency.
- ½ teaspoon desired extra extracts (optional) – Almond or peppermint extracts can add a delightful twist to the flavor profile. These extracts can offer a surprising and refreshing contrast to the vanilla base.
- 1 ½ cups holiday sprinkles – Provide a festive, decorative touch that enhances the visual appeal of your cookies. The sprinkles add a pop of color and texture, making the cookies look more appealing and fun.
Step-by-Step Baking Instructions
1. Prepare Your Dough
To start, you’ll need a stand mixer fitted with a paddle attachment. In the mixer’s bowl, combine the dry ingredients: flour, baking powder, salt, powdered sugar, and granulated sugar. Mix on medium speed until they’re well combined. Gradually add the butter chunks and vanilla extract, continuing to mix until the dough forms a cohesive ball. The key here is to ensure that the butter is fully incorporated, creating a smooth, uniform dough.
The process of mixing the dry ingredients first ensures that the baking powder and salt are evenly distributed, preventing any bitter clumps. Adding the butter gradually helps it incorporate smoothly, creating a rich and cohesive dough. The dough should be pliable yet firm enough to hold its shape.
2. Divide and Color Your Dough
Once your dough is ready, remove it from the mixer and divide it into two equal portions. Return one portion to the mixer and add your chosen food coloring along with any additional extracts, like almond or peppermint, for an extra layer of flavor. Mix until the color is evenly distributed throughout the dough. This step allows for creativity and personalization, so feel free to experiment with different color combinations that resonate with you or your loved ones.
This step is where you can let your creativity shine. You could opt for traditional Valentine’s colors like pink and red or go for something unique like purple or even a gradient effect by using two shades of the same color. The additional extracts can provide unexpected flavor profiles that surprise and delight those who taste your cookies.
3. Roll and Chill
Roll each portion of dough between two sheets of wax paper until they measure approximately 11 x 9 inches and are ¼ inch thick. This ensures an even thickness, which is crucial for uniform baking. Carefully transfer both portions to a cookie sheet and refrigerate them for at least one hour until they firm up. Chilling the dough is a vital step as it prevents the cookies from spreading too much during baking, preserving their beautiful swirl shape.
Chilling is a crucial step that shouldn’t be skipped. It allows the butter to solidify, which helps the cookies maintain their shape and structure during baking. This step also intensifies the flavors as the dough rests, resulting in a more delicious cookie.
4. Assemble the Swirl
Once the dough is sufficiently chilled, remove the top sheets of wax paper from each portion. Lightly brush the uncolored, vanilla dough with water; this acts as a glue to hold the layers together. Carefully flip the colored dough onto the uncolored one, ensuring they align perfectly. Press the edges gently to seal them together, creating a seamless bond that will become the signature swirl of your cookies.
Aligning the dough layers perfectly is essential to achieving a clean, professional-looking swirl. This is a step where patience and precision pay off, ensuring that the final cookies look as good as they taste.
5. Form the Swirl
Trim the edges of the dough to create straight, even lines. While the dough should still be cold, it must be pliable. Begin rolling it into a log from the long side, creating a beautiful, eye-catching swirl pattern. This step requires a gentle touch to maintain the integrity of the swirl without breaking the dough.
Rolling the dough into a log is a technique that might take a little practice. Rolling too tightly can cause the dough to crack, while rolling too loosely might lead to gaps in the swirl. Finding the right balance is key to achieving that perfect, seamless swirl.
6. Add the Festive Touch
Pour your holiday sprinkles onto a large platter. Gently roll your dough log in the sprinkles until it’s fully coated. This not only enhances the visual appeal but also adds a delightful crunch to each bite. Wrap the log in plastic wrap and chill for a few more hours, or freeze it for up to three months if you’re planning to make them ahead of time.
Rolling the dough log in sprinkles is a fun step that can be enjoyed by kids and adults alike. It transforms the simple cookie dough into a festive treat that looks like it came straight from a bakery. The chill time after this step is crucial for setting the sprinkles in place and ensuring clean slices for baking.
7. Slice and Bake
Preheat your oven to 350°F (175°C). Slice the dough into ¼ inch rounds using a sharp knife, ensuring each slice maintains its swirl pattern. Place the slices on parchment-lined baking sheets, giving them enough space to spread slightly as they bake. Bake for 15 to 17 minutes, or until the edges start to turn golden brown, indicating that the cookies are perfectly cooked.
Using a sharp knife is essential for keeping the swirl intact as you slice through the dough. The baking time may vary slightly depending on your oven, so keep an eye on the first batch to determine the optimal time for subsequent batches.
8. Cool and Enjoy
Allow the cookies to rest on the baking sheet for about 5 minutes before transferring them to a wire rack to cool completely. This ensures they set properly and develop a nice, crisp texture. Enjoy these lovely swirl cookies with a cup of tea, coffee, or a glass of milk. Their delightful appearance and exquisite taste make them a perfect treat to share with loved ones or as a special indulgence for yourself.
Cooling the cookies on the baking sheet for a few minutes helps them firm up and makes transferring them to a wire rack easier. This step ensures that they don’t crumble or break apart. Once completely cooled, these cookies can be stored in an airtight container to maintain their freshness.
Tips for Perfect Swirl Cookies
- Chill Thoroughly: Chilling is crucial for maintaining the shape and structure of your cookies. Don’t skip this step, as it helps the dough firm up and ensures the cookies hold their shape during baking.
- Uniform Thickness: Roll your dough evenly to ensure consistent baking and a professional appearance. This attention to detail will result in cookies that not only taste great but also look like they came from a high-end bakery.
- Experiment with Colors: Customize the swirl to match your Valentine’s Day theme or any special occasion by using different food coloring. This is where your creativity can truly shine, allowing you to tailor the cookies to suit different tastes and preferences.
- Flavor Variations: Try adding different extracts or spices to the dough for a unique flavor twist. Almond, lemon, or even a hint of cinnamon can elevate the basic cookie flavor to something extraordinary.
- Storage Tips: If you’re making these cookies ahead of time, store them in an airtight container to maintain their freshness. They can also be frozen for longer storage, allowing you to prepare in advance for special events.
Creative Presentation Ideas

Presentation is key when it comes to serving these delightful cookies, especially on Valentine’s Day. Consider these creative ideas to make your cookies truly stand out:
Gift Boxes: Arrange your swirl cookies in a decorative box lined with parchment paper. Add a ribbon and a handwritten note to create a thoughtful gift that shows you care.
Cookie Platters: Display the cookies on a beautiful platter surrounded by fresh flowers or Valentine’s Day-themed decorations. This creates a stunning centerpiece for any gathering.
Individual Wrappings: Wrap each cookie individually in clear cellophane bags tied with colorful ribbons. This is perfect for party favors or small gifts for colleagues and friends.
Cookie Towers: Stack the cookies in a tower and secure them with a decorative skewer or ribbon for a striking presentation.
Paired with Beverages: Serve the cookies alongside a selection of teas, coffees, or hot chocolate. Offer different pairings to complement the flavors of the cookies, enhancing the overall tasting experience.
The Joy of Homemade
Baking these Valentine’s Day Swirl Cookies is more than just creating a delicious treat—it’s about the joy of crafting something special with your own hands. The process of measuring, mixing, rolling, and decorating can be a relaxing and rewarding experience, especially when shared with loved ones. Involving children or friends in the baking process can turn it into a fun group activity, creating memories as sweet as the cookies themselves.
Moreover, the flexibility of this recipe allows for endless customization, making it easy to adapt to different tastes and occasions. Whether you prefer a classic vanilla-almond combination or want to experiment with bold flavors and colors, these cookies offer a canvas for your culinary creativity.
With this comprehensive guide, you’re ready to create a beautiful batch of Valentine’s Day Swirl Cookies. These cookies are not only a feast for the eyes but also a delightful treat to share with those you love. Their vibrant colors, tender texture, and festive sprinkles make them a standout choice for any Valentine’s celebration. Happy baking, and may your Valentine’s Day be as sweet as these charming cookies!


Valentine’s Day Swirl Cookies

These delightful swirl cookies are perfect for Valentine’s Day, featuring colorful swirls and festive sprinkles.
- Stand Mixer
- Cookie Sheet
- Wax Paper
- Pastry brush
- Plastic Wrap
Cookie Dough
- 2 cups flour
- 1/2 tsp baking powder
- 1/4 tsp salt
- 2/3 cup unsifted powdered sugar
- 1/4 cup granulated sugar
- 2 1/2 sticks unsalted butter (cut in chunks)
- 1 tsp vanilla
- 1/2 tsp food coloring of your choice (and/or 1/2 teaspoon of any desired extra extracts)
- 1 1/2 cup holiday sprinkles
- In the bowl of a stand mixer, combine flour, baking powder, salt, and sugars with paddle on medium until well blended. Add butter in, gradually, and continue mixing. Add in vanilla extract.
- Continue mixing until the dough forms a ball.
- Remove all your dough and divide into two equal parts.
- Return one portion back into the mixer and add the food coloring and any extra extracts.
- Mix until the color is spread out evenly.
- Roll out each portion of your dough, between two sheets of wax paper until it reaches about 11 x 9 inches and is 1/4 inch thick.
- Slide both onto a cookie sheet and chill in the refrigerator for at least 1 hour.
- When firm, remove the top sheets of wax paper from both. Brush the uncolored vanilla dough lightly with water using a pastry brush.
- Then flip the colored dough onto the vanilla uncolored dough so they are stacked atop each other and even.
- Press the edges lightly with your fingertips to seal them together. Using a small knife, trim the edges of the dough to make straight, even lines.
- Be sure your dough is still cold, but flexible. Once it’s ready, begin rolling the long side of dough into a swirl, jelly-roll style.
- Pour out sprinkles onto a large platter and set aside. Now gently lift your dough log onto the sprinkles and roll away.
- Wrap in plastic wrap and chill for a few hours or you can freeze the dough for up to three months at this point.
- Slice your dough into 1/4 inch slices and bake on parchment lined baking sheets in a preheated 350 degree oven for 15 to 17 minutes or until the edges are starting to turn golden brown.
- Let the cookies rest on the baking sheet for about 5 minutes, then move them to a cookie rack to finish cooling.
For best results, ensure your dough is chilled thoroughly. You can experiment with different food coloring and extract combinations for unique flavors and colors.
