

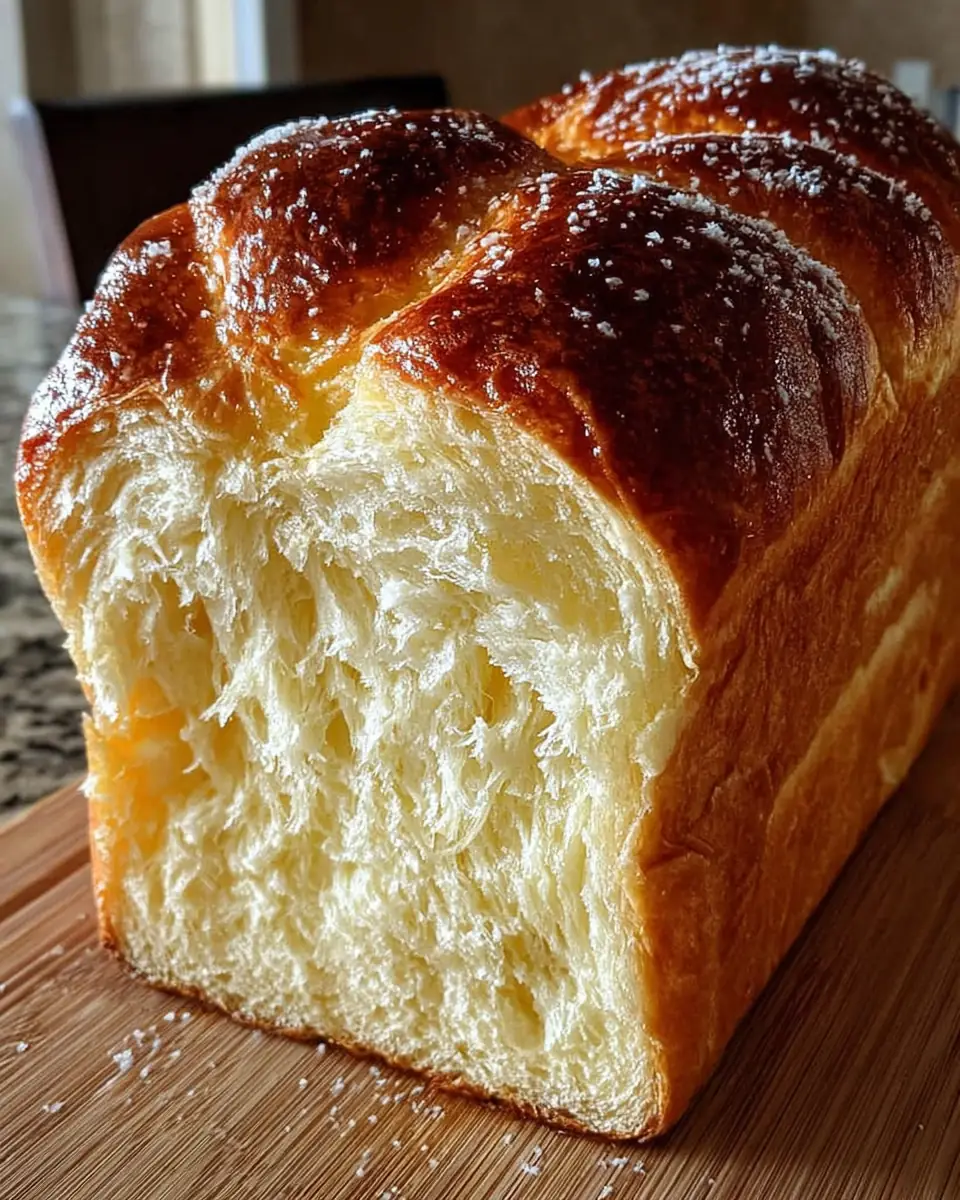
Amazing Sweet Hawaiian Yeast Bread in 1 Hour: A Culinary Delight
There’s something magical about the sweet, fluffy texture of Hawaiian bread that makes it a favorite on any table. Whether you’re serving it at a family gathering or enjoying it as a special treat, this Amazing Sweet Hawaiian Yeast Bread recipe offers a delightful twist with its quick preparation time. With a hint of pineapple and a touch of sweetness, you’ll have a batch of warm, golden rolls ready to enjoy in just over an hour!
The Allure of Hawaiian Bread
Hawaiian bread’s appeal lies in its unique combination of flavors and textures. Originating from the islands, this bread is known for its slightly sweet taste, often enhanced by pineapple juice. This tropical ingredient not only adds flavor but also contributes to the bread’s moisture and softness. Hawaiian bread is versatile and can be enjoyed alone or as a complement to both sweet and savory dishes. The addition of a touch of vanilla and the buttery sheen on top make this bread irresistible.
The history of Hawaiian bread is as rich and flavorful as the bread itself. It traces back to the Portuguese immigrants who settled in Hawaii, bringing with them their traditional sweet bread recipes. Over time, these recipes were adapted to include local ingredients like pineapple, giving birth to the unique Hawaiian sweet bread we know today. This cultural fusion reflects the diverse influences that have shaped Hawaiian cuisine, making it a vibrant and eclectic culinary tradition.
Ingredients: A Closer Look
Understanding the role of each ingredient is key to mastering this recipe. Let’s take a deeper dive into what makes this bread so special:
Warm Milk (1 cup, 105-115°F): The warmth of the milk is crucial for activating the yeast. Yeast is a living organism that, when activated by warmth and sugar, begins to ferment, producing carbon dioxide that makes the dough rise. The milk also adds a slight creaminess to the bread, enhancing its flavor and texture.
Granulated Sugar (1/4 cup, plus 1 teaspoon): Sugar serves a dual purpose—it sweetens the bread and acts as food for the yeast, kickstarting the fermentation process. The sugar also helps create a tender crumb and adds a subtle sweetness that complements the pineapple juice.
Active Dry Yeast (2 1/4 teaspoons, or 1 packet): Yeast is essential for the bread’s rise and airy texture. Make sure your yeast is fresh for the best results. If you’re unsure about your yeast’s freshness, you can test it by dissolving it in a small amount of warm water with a pinch of sugar and waiting for it to foam.
Unsalted Butter (1/2 cup, melted): Butter adds richness and moisture, contributing to the bread’s tender crumb. It also imparts a buttery flavor that pairs beautifully with the sweetness of the pineapple juice and sugar.
Pineapple Juice (1/4 cup): This is the secret ingredient that gives Hawaiian bread its distinctive, subtle sweetness. It also helps keep the bread moist. The acidity of the pineapple juice can also enhance the bread’s rise, giving it a light, fluffy texture.
Large Egg (1, lightly beaten): Eggs add moisture and richness, helping to create a soft and tender bread. They also contribute to the bread’s structure and color, giving it a golden hue.
Vanilla Extract (1 teaspoon): Adds a sweet, aromatic note that enhances the overall flavor profile. Vanilla has a way of rounding out flavors, making the bread taste more complex and satisfying.
Salt (1 teaspoon): Balances the sweetness and strengthens the dough structure. Salt is essential in bread making as it controls yeast activity and enhances the flavors of other ingredients.
All-Purpose Flour (4-4 1/2 cups): The foundation of your bread, providing structure and texture. The amount may vary depending on humidity and other factors. Flour is the backbone of the bread, and its protein content affects the bread’s texture. All-purpose flour strikes a balance between tenderness and structure, making it ideal for this recipe.
Melted Butter for Brushing (1 tablespoon): Gives the finished rolls a beautiful, glossy finish and adds extra flavor. This final touch not only enhances the appearance of the rolls but also keeps them moist and delicious.
Directions: Step-by-Step
1. Activate the Yeast
Begin by whisking together the warm milk and 1 teaspoon of sugar in a large bowl. The warmth of the milk is essential; it should be warm to the touch but not hot, as excessively hot liquid can kill the yeast. Sprinkle the yeast over the milk mixture and let it sit for 5-10 minutes until it becomes foamy. This foamy layer indicates that the yeast is active and ready to work its magic.
Activating the yeast is a critical step that sets the stage for successful bread making. The yeast needs warmth, moisture, and food (sugar) to start fermenting. This process produces carbon dioxide, which causes the dough to rise, giving the bread its light, airy texture. If the yeast doesn’t foam, it may be inactive, and you’ll need to start over with fresh yeast.
2. Combine Wet Ingredients
Once your yeast is activated, add the melted butter, pineapple juice, beaten egg, vanilla extract, and salt to the yeast mixture. Whisk everything together thoroughly to create a homogeneous mixture. The combination of these ingredients not only provides flavor but also creates the right chemical environment for the dough to develop properly.
The wet ingredients work together to create a rich, flavorful base for the bread. The melted butter and egg add moisture and richness, while the pineapple juice and vanilla extract infuse the dough with sweet, aromatic notes. The salt, although a small component, plays a crucial role in balancing the sweetness and enhancing the overall flavor.
3. Form the Dough
Gradually incorporate the flour into the wet ingredients, adding 1 cup at a time. Mix with a wooden spoon until a shaggy dough begins to form. At this point, the dough should be somewhat sticky but manageable. It’s important not to add too much flour, which can result in a dry, tough bread.
Forming the dough is where the magic starts to happen. As you mix the flour with the wet ingredients, gluten begins to form. Gluten is a protein network that gives bread its structure and elasticity. The key is to add just enough flour to bring the dough together without making it too dry. The dough should be soft and slightly sticky, which will result in a tender, light bread.
4. Knead the Dough
Transfer the dough to a lightly floured surface and knead for 8-10 minutes. Kneading develops the gluten in the flour, which gives the bread its structure. You’re aiming for a smooth and elastic texture that springs back when pressed. If the dough is too sticky, add a little more flour, but be careful not to overdo it.
Kneading is a therapeutic and essential step in bread making. It encourages the gluten strands to align and strengthen, creating a dough that can hold the gases produced by the yeast. This results in a well-risen, fluffy bread. As you knead, you’ll notice the dough becoming smoother and more elastic, a sign that the gluten is developing properly.
5. First Rise
Place the dough in a lightly oiled bowl, turning it once to ensure it’s coated. Cover the bowl with plastic wrap or a clean kitchen towel and let the dough rise in a warm place for 1-1.5 hours, or until it has doubled in size. This step is crucial for developing the bread’s flavor and texture.
The first rise, also known as fermentation, allows the yeast to do its work, fermenting the sugars in the dough and producing carbon dioxide. This not only causes the dough to rise but also develops the bread’s flavor. The longer the dough rises, the more flavorful the bread will be. However, for this quick recipe, 1-1.5 hours is sufficient to achieve a good rise and develop flavor.
6. Shape the Rolls
Once risen, gently punch down the dough to release any air. Turn it out onto a lightly floured surface and divide it into 12 equal pieces. Shape each piece into a round roll. Shaping the dough helps to create an even crumb and ensures that the rolls bake evenly.
Shaping the rolls is a fun and creative step. As you form each piece into a round roll, you’re not only creating the final shape but also ensuring an even crumb. An even crumb means that the rolls will bake uniformly, with no dense or undercooked spots. To shape the rolls, gently stretch the surface of the dough down and tuck it under, creating a smooth top.
7. Second Rise
Arrange the rolls in a greased 9×13 inch baking pan, leaving a little space between each. Cover the pan with plastic wrap and let the rolls rise again in a warm spot for 30-45 minutes, or until they look puffy. This second rise is shorter but essential for giving the rolls their final shape and texture.
The second rise, also known as proofing, is a shorter rise that allows the shaped rolls to expand and aerate. This step is crucial for achieving light, fluffy rolls. The proofing time can vary depending on the temperature of your kitchen, but the rolls should look noticeably puffy and soft before baking.
8. Bake
Preheat your oven to 375°F (190°C). Bake the rolls for 18-22 minutes, or until they are golden brown on top. Baking times can vary, so keep an eye on them towards the end of the baking time to prevent over-browning.
Baking transforms the dough into golden, fragrant rolls. The heat of the oven causes the gases trapped in the dough to expand, giving the rolls their final rise. The sugars and proteins on the surface of the rolls undergo the Maillard reaction, creating a beautiful golden-brown crust. Keep a close eye on the rolls towards the end of the baking time to ensure they don’t over-brown.
9. Finish
As soon as you remove the rolls from the oven, brush the tops with the remaining melted butter. This adds a delicious sheen and extra flavor, making the rolls even more tempting.
The final touch of brushing the rolls with melted butter gives them a glossy finish and enhances their flavor. The butter seeps into the crust, adding richness and keeping the rolls soft and tender. It’s a simple step that makes a big difference in the final product.
10. Serve
Allow the rolls to cool slightly before serving. Enjoy them warm as a side dish, sandwich base, or simply with a smear of butter. Their soft, pillowy texture and sweet flavor make them a delightful addition to any meal.
Serving the rolls warm enhances their flavor and texture. The sweet, fluffy bread pairs beautifully with savory dishes like roast chicken or turkey, or it can be enjoyed on its own with a pat of butter or jam. The possibilities are endless, and these rolls are sure to be a hit at any meal.
Time Breakdown

- Prep Time: 2 hours
- Cook Time: 20 minutes
- Total Time: 2 hours 20 minutes
Tips for Success
Temperature Control: Ensuring your milk is at the correct temperature is crucial. If it’s too hot, it can kill the yeast; if it’s too cold, the yeast won’t activate. Aim for a temperature between 105-115°F.
Proofing Environment: A warm, draft-free area is ideal for proofing your dough. If your kitchen is cool, consider placing the bowl in a slightly warmed (but off) oven. You can also create a makeshift proofing box by placing a pan of hot water on the bottom rack of your oven and the dough on the rack above.
Flour Measurement: Be mindful of how you measure flour. Fluff it up in the container, spoon it into the measuring cup, and level it off with a knife. Packing flour into the cup can result in using too much, leading to dense rolls.
Kneading Technique: Kneading is an essential step for gluten development. Use the heel of your hand to push the dough away from you, fold it over, and repeat the process. The dough should become smooth and elastic.
Variations: You can customize this recipe by adding ingredients such as shredded coconut, chopped nuts, or even raisins for added texture and flavor. These additions can give your Hawaiian bread a unique twist and make it even more special.
Conclusion
This Amazing Sweet Hawaiian Yeast Bread in just over an hour is a testament to the beauty of quick bread-making without sacrificing taste or texture. Its subtle sweetness and soft, pillowy structure make it a versatile addition to any meal. Whether you’re a seasoned baker or a novice, this recipe is straightforward and rewarding, promising a delightful experience with every bite. Enjoy the tropical flavors and the satisfaction of homemade bread with minimal effort! Hawaiian bread is more than just a side dish; it’s a centerpiece that brings warmth and joy to every table.
The joy of baking your own Hawaiian bread lies not only in the delicious result but also in the process itself. From the moment you mix the ingredients to the final brush of butter on the warm rolls, each step is an opportunity to connect with the art of bread making. The aroma of freshly baked bread wafting through your home is a reward in itself, inviting family and friends to gather and share in the simple pleasure of homemade food. Hawaiian bread is a celebration of flavors and cultures, a delicious reminder of the beauty of culinary traditions passed down through generations.


Amazing Sweet Hawaiian Yeast Bread in 1 Hour
This delicious sweet Hawaiian bread is perfect for any occasion. With a hint of pineapple and a buttery finish, it’s sure to be a hit!
- 9×13 inch baking pan
Dough
- 240 ml warm milk (105-115°F)
- 60 g granulated sugar (plus 1 teaspoon)
- 2.25 tsp active dry yeast ((1 packet))
- 120 g unsalted butter (melted)
- 60 ml pineapple juice
- 1 large egg (lightly beaten)
- 1 tsp vanilla extract
- 1 tsp salt
- 480-540 g all-purpose flour
- 15 g melted butter (for brushing)
- In a large bowl, whisk together warm milk and 1 teaspoon sugar. Sprinkle yeast over the top and let sit for 5-10 minutes until foamy.
- Add melted butter, pineapple juice, egg, vanilla extract, and salt to the yeast mixture. Whisk to combine.
- Gradually add flour, 1 cup at a time, mixing with a wooden spoon until a shaggy dough forms.
- Turn the dough out onto a lightly floured surface and knead for 8-10 minutes, until smooth and elastic.
- Place the dough in a lightly oiled bowl, turning once to coat. Cover with plastic wrap and let rise in a warm place for 1-1.5 hours, or until doubled in size.
- Gently punch down the dough and turn it out onto a lightly floured surface. Divide the dough into 12 equal pieces.
- Shape each piece into a round roll and place them in a greased 9×13 inch baking pan, leaving a little space between each roll.
- Cover the pan with plastic wrap and let the rolls rise again in a warm place for 30-45 minutes, or until puffy.
- Preheat your oven to 375°F (190°C).
- Bake for 18-22 minutes, or until the rolls are golden brown on top.
- Remove from the oven and immediately brush the tops with 1 tablespoon of melted butter.
- Let cool slightly before serving.
This bread is perfect served warm and can be enjoyed on its own or with a spread of butter or jam. For a twist, consider adding shredded coconut or chopped nuts to the dough.
