

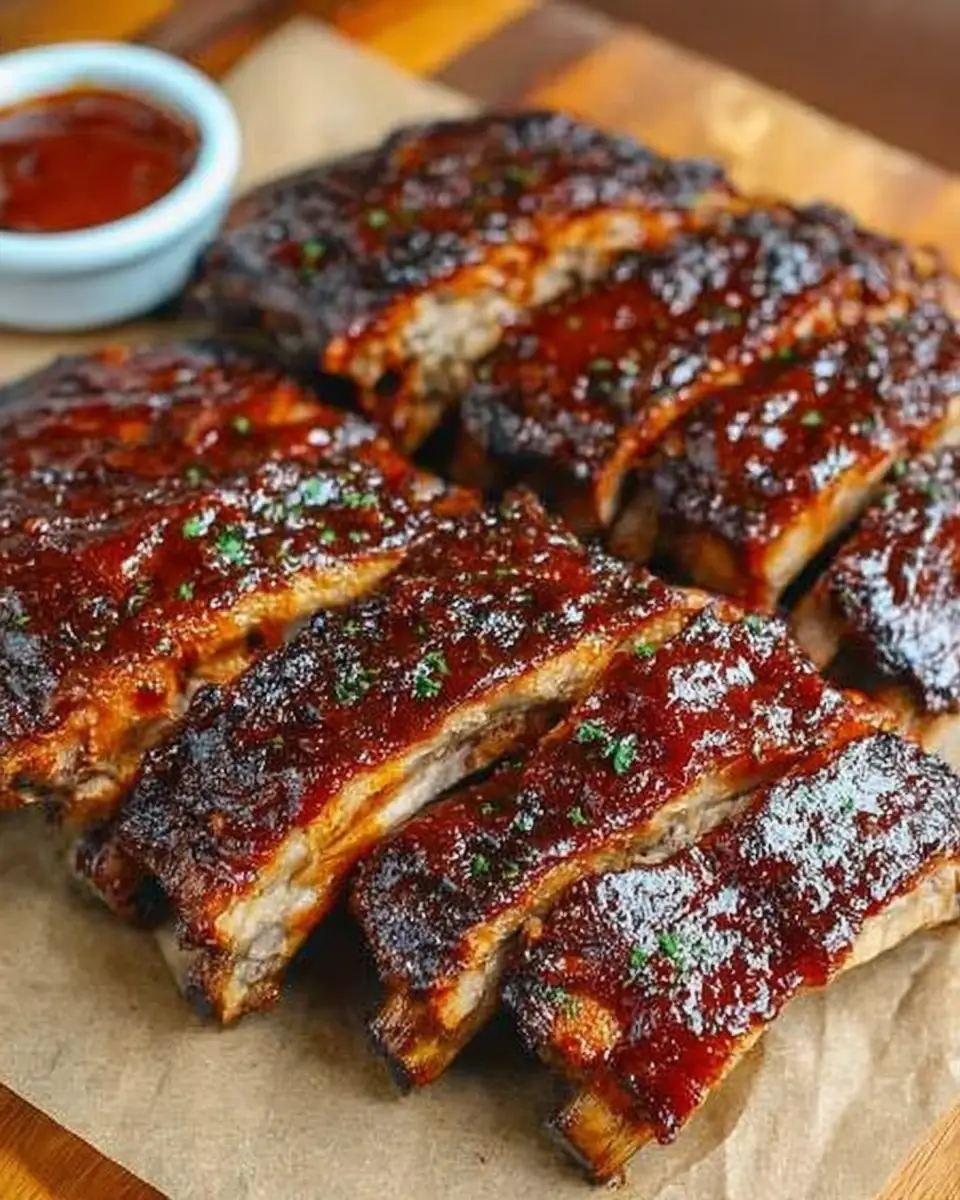
Oven Baked BBQ Ribs: A Step-by-Step Guide to Succulent Perfection
There’s something undeniably satisfying about biting into a perfectly cooked, tender rib slathered in smoky BBQ sauce. Whether you’re planning a summer cookout or simply craving a taste of smoky barbecue goodness on a chilly evening, this oven-baked BBQ ribs recipe promises to deliver on flavor, tenderness, and ease. Let’s dive into how you can achieve restaurant-quality ribs from the comfort of your kitchen.
Nutritional Information
Before we get cooking, here’s a quick overview of the nutritional content per serving (approximately 1/4 rack, 1 lb raw weight):
- Calories: 650-750
- Protein: 45-55g
- Carbohydrates: 30-40g
- Fat: 35-45g
- Fiber: 1-2g
- Sodium: 800-1000mg
While ribs are a rich and indulgent treat, it’s important to remember that moderation is key. The balance of protein and carbohydrates makes these ribs not only delicious but also a satisfying meal. Pairing them with lighter side dishes can help balance your overall nutritional intake.
Ingredients
- 2 racks (about 4 lbs total) pork spare ribs
- 1/4 cup light brown sugar, packed
- 1 tablespoon paprika
- 1 teaspoon garlic powder
- 1 teaspoon onion powder
- 2 teaspoons salt
- 1/2 teaspoon black pepper
- 1/2 teaspoon cayenne pepper (optional, for a kick)
- 1 1/2 cups of your favorite BBQ sauce
These ingredients are carefully selected to enhance the natural flavors of the pork. The blend of spices in the dry rub adds complexity and layers of flavor, while the BBQ sauce provides that essential tangy, sweet, and smoky finish.
Instructions
Step 1: Prepare the Ribs
Start by prepping your pork spare ribs. The key to tender ribs is removing the thin membrane on the bone side. This can be done by locating the edge of the membrane at one end of the rack. Use a butter knife or the tip of a spoon to gently lift a corner, then grasp it with a paper towel for a better grip and peel it away. Trim excess fat if desired, but remember, some fat is good for flavor and moisture. Make sure to pat the ribs dry with paper towels.
Removing the membrane is crucial as it helps the rub penetrate the meat better, ensuring every bite is flavorful and tender. This step is often overlooked but makes a significant difference in the final texture of your ribs.
Step 2: Mix the Dry Rub
In a small bowl, combine the brown sugar, paprika, garlic powder, onion powder, salt, black pepper, and cayenne pepper (if using). Mix thoroughly to ensure even distribution, breaking up any clumps of brown sugar.
The dry rub is the backbone of our flavor profile. Paprika adds a mild heat and vibrant color, while the garlic and onion powders contribute depth. The brown sugar caramelizes during cooking, adding a sweet, savory crust to the ribs.
Step 3: Apply the Dry Rub
Generously coat both sides of the ribs with the dry rub, pressing it into the meat to help it stick. For deeper flavor, let the seasoned ribs sit in the refrigerator overnight, tightly wrapped. If you’re short on time, let them sit at room temperature for about 30 minutes.
Allowing the ribs to marinate overnight with the rub infuses them with robust flavors. If time permits, this step can elevate your ribs from good to great, as the spices have more time to penetrate the meat.
Step 4: Preheat the Oven
Preheat your oven to 275°F (135°C) — the perfect temperature for achieving tender, fall-off-the-bone ribs.
Slow cooking at this low temperature is essential for breaking down the connective tissues in the ribs, resulting in that melt-in-the-mouth experience we all crave. Patience is key here; rushing this process won’t yield the same results.
Step 5: Wrap the Ribs for Baking
Use heavy-duty aluminum foil to wrap each rack. Place a rack meat-side up on a foil sheet, bring the edges up, and cover with another sheet, sealing tightly to trap moisture. This step ensures that the ribs bake in a steamy environment, enhancing tenderness.
Creating this sealed environment is akin to braising, allowing the ribs to cook in their own juices. This method ensures the meat retains moisture, preventing it from drying out during the long cooking time.
Step 6: Bake Low and Slow
Place the wrapped ribs on a baking sheet to catch any leaks and bake for 2.5 to 3 hours. You’re aiming for the ribs to be tender when gently probed.
The extended cooking time allows the flavors to develop fully while ensuring that the meat reaches the desired level of tenderness. It’s during this time that the magic really happens.
Step 7: Check for Tenderness
After 2.5 hours, carefully open one foil packet (beware of steam!). Test the meat; it should be very tender and the bones slightly exposed. If not, reseal and return to the oven for another 30-60 minutes.
Checking for tenderness is crucial to ensure your ribs are perfectly cooked. The meat should easily pull away from the bone, indicating that it’s ready for the next delicious step.
Step 8: Prepare for Finishing
Once tender, remove from the oven and increase the temperature to 375°F (190°C). Unwrap the ribs, discard the foil and any liquid, and place the ribs on a clean baking sheet, meat-side up.
Increasing the oven temperature prepares the ribs for the final glaze and caramelization process, crucial for that mouthwatering BBQ finish.
Step 9: Baste with BBQ Sauce
Brush the ribs with half of your chosen BBQ sauce, ensuring an even coating.
This initial basting layer fuses with the rub, creating a sticky, savory crust. Choose a BBQ sauce that complements your palate—whether it’s tangy, sweet, or spicy, it should enhance the natural flavors of the ribs.
Step 10: Bake to Caramelize
Return the ribs to the oven for 15-20 minutes, or until the sauce is bubbly and caramelized.
This step is where your ribs start to resemble those you might find at a top-notch BBQ joint. The heat caramelizes the sugars in the sauce, locking in flavor and giving the ribs that iconic glossy sheen.
Step 11: Second Basting and Broil (Optional)
For extra gloss, apply the remaining sauce, and broil for 3-5 minutes, keeping a close eye to avoid burning.
The broiling step is optional but highly recommended for those who love that extra layer of sauce that’s sticky and slightly charred. It adds a depth of flavor and texture that is truly irresistible.
Step 12: Rest and Serve
After removing the ribs from the oven, let them rest for 5-10 minutes. This rest period allows the juices to redistribute, enhancing flavor and tenderness. Slice between the bones and serve immediately.
Resting is a crucial step that ensures every bite is juicy. Cutting into the ribs too soon can result in a loss of flavorful juices, so patience here pays off.
Enjoy Your BBQ Masterpiece

Arrange the ribs on a platter and serve them hot, letting every bite be a testament to your culinary prowess. These oven-baked BBQ ribs are sure to be a hit, bringing the essence of summer barbecues to your table any time of the year. Whether paired with coleslaw, cornbread, or enjoyed on their own, these ribs are bound to become a family favorite.
Pairing Suggestions
To complement your ribs, consider serving with classic sides that enhance the BBQ experience. Creamy coleslaw offers a refreshing crunch and a bit of tang that contrasts beautifully with the rich ribs. Cornbread provides a sweet, buttery counterpart, while a side of baked beans can add a hearty, savory element. For a lighter option, a simple green salad or grilled vegetables can balance the meal.
Tips for Success
- Quality Matters: Choose high-quality ribs from a trusted butcher or supplier. The meatier and more uniform the ribs, the better the final dish.
- Experiment with Rubs and Sauces: Feel free to customize the rub and sauce to suit your taste. Add herbs like thyme or rosemary to the rub, or try a mustard-based BBQ sauce for a tangy twist.
- Use a Meat Thermometer: To ensure perfect doneness, use a meat thermometer. The internal temperature should reach around 190°F (88°C) for ultimate tenderness.
- Storage and Reheating: If you have leftovers, store them in an airtight container in the refrigerator for up to three days. Reheat gently in the oven at a low temperature or enjoy cold.
Hosting a BBQ Night
Why not turn your rib feast into a full-fledged BBQ night? Invite friends and family over, set up a casual outdoor dining area, and enjoy a variety of BBQ dishes. Offer a selection of sauces for guests to try, and perhaps even a rib-eating contest for a bit of fun. A playlist of classic summer tunes can set the perfect ambiance.
Conclusion
Oven-baked BBQ ribs are a delightful dish that captures the essence of barbecue without the need for a grill or smoker. With patience, quality ingredients, and a few simple techniques, you can create ribs that are tender, flavorful, and sure to impress. Whether it’s a cozy family dinner or a festive gathering, these ribs are a versatile and satisfying choice. So roll up your sleeves, fire up that oven, and let the aroma of BBQ fill your home. Happy cooking!


Oven Baked BBQ Ribs
Experience the deliciousness of fall-off-the-bone BBQ ribs baked right in your oven. Perfect for a cozy dinner at home.
- Baking Sheet
- Aluminum Foil
Ribs
- 2 racks pork spare ribs
Dry Rub
- 60 g light brown sugar (packed)
- 1 tbsp paprika
- 1 tsp garlic powder
- 1 tsp onion powder
- 2 tsp salt
- 0.5 tsp black pepper
- 0.5 tsp cayenne pepper (optional, for a kick)
Finishing
- 375 ml BBQ sauce (your favorite)
- Prepare the Ribs: Remove the thin membrane from the bone side of each rack. Trim excess fat if desired and pat ribs dry.
- Mix the Dry Rub: Combine brown sugar, paprika, garlic powder, onion powder, salt, black pepper, and cayenne pepper.
- Apply the Dry Rub: Season both sides of the ribs with the dry rub. Let them sit for 30 minutes or refrigerate overnight.
- Preheat the Oven: Preheat to 275°F (135°C).
- Wrap the Ribs for Baking: Wrap each rack in heavy-duty aluminum foil, sealing tightly.
- Bake Low and Slow: Place foil-wrapped ribs on a baking sheet and bake for 2.5 to 3 hours.
- Check for Tenderness: Test ribs for tenderness after 2.5 hours. If needed, bake longer.
- Prepare for Finishing: Increase oven temperature to 375°F (190°C). Unwrap ribs and discard foil.
- Baste with BBQ Sauce: Brush ribs with half the BBQ sauce.
- Bake to Caramelize: Return sauced ribs to oven and bake for 15-20 minutes.
- Second Basting and Broil (Optional): Apply remaining BBQ sauce and broil for a charred finish.
- Rest and Serve: Let ribs rest for 5-10 minutes before slicing and serving.
For extra flavor, marinate the ribs overnight with the dry rub. Serve with coleslaw or potato salad for a complete meal.
